Overview of campaign management
Campaign Management in CreatorDB allows you to organize and track your influencer marketing campaigns effectively. You can create campaigns, manage team members, and monitor progress through the Kanban board. This guide provides an overview of the key features and functionalities available for campaign management. Create a new campaign by clicking the Create Campaign button. You can set up campaign details, including the campaign name, duration, budget, and objectives. You can even specify your target audience demographic details and the platforms and content you’d like to sponsor in this influencer campaign. Once created, you can add team members and assign them roles based on their responsibilities. Manage campaigns easily within the CreatorDB Kanban board, where you can track the progress of each campaign and its associated creators. You can move cards across different stages, add comments, and update creator statuses to keep everyone on the same page. Use the campaign briefs to provide context and instructions for your team, ensuring that everyone understands the campaign goals and requirements. For details, see Managing campaigns in Kanban board view.Campaign list user interface
The campaign list interface in CreatorDB provides a centralized view of all your campaigns, allowing you to easily manage and track them. From this interface, you can create new campaigns, search for existing ones, and access important campaign details at a glance. The interface is designed to help you stay organized and efficient in managing your influencer marketing efforts.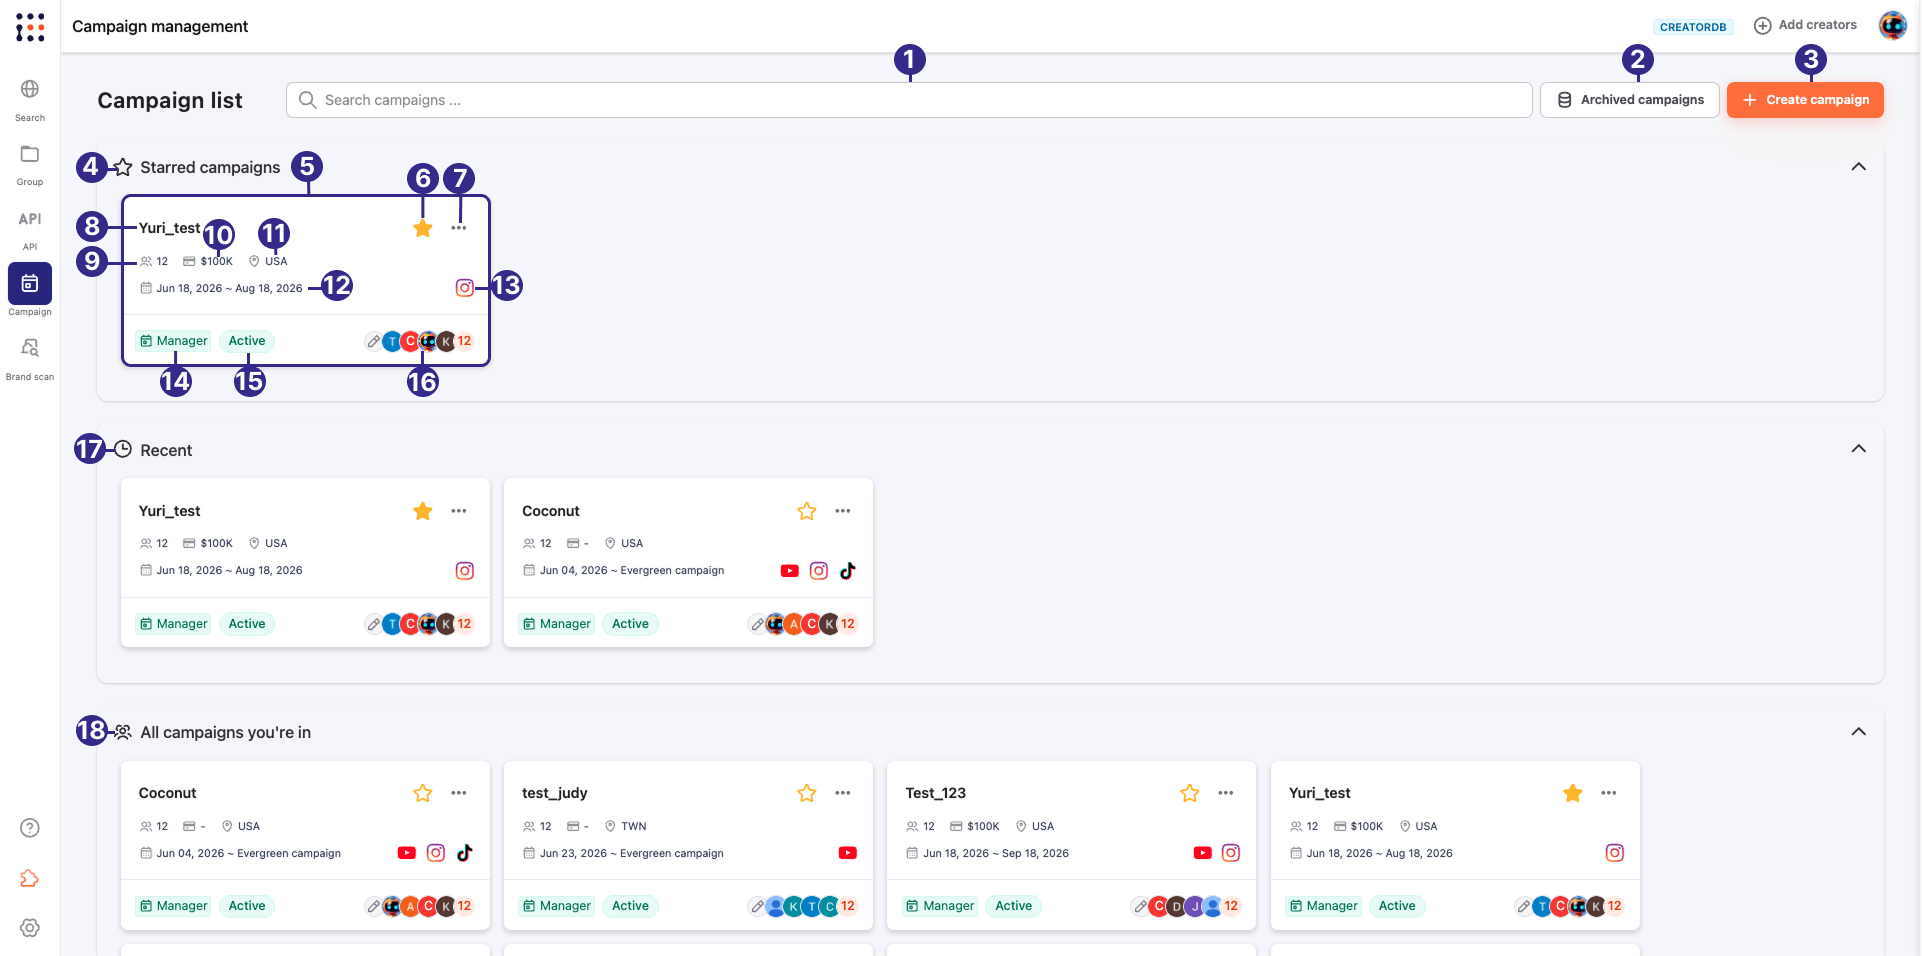
Managing organizations
You can manage your organization settings and members in CreatorDB to ensure that the right people have access to the right campaigns and information. This includes managing organization roles and permissions, creating and editing organizations, and managing organization members.Organization roles and permissions
CreatorDB organizations use a role-based permission system to control what each team member can do at the organization level. When you add a user to your organization, you assign them one of four roles — Owner, Admin, Member, or Guest — each with a different level of access. CreatorDB recommends assigning the most restrictive role that still allows a person to do their work.Organization roles
The table below describes each role and its intended use.Organization management permissions
The table below shows which actions each role can perform at the organization level.
For details on permissions within a campaign, see Campaign roles and permissions.
Creating an organization
- Log in to your CreatorDB account.
- Click Campaign.
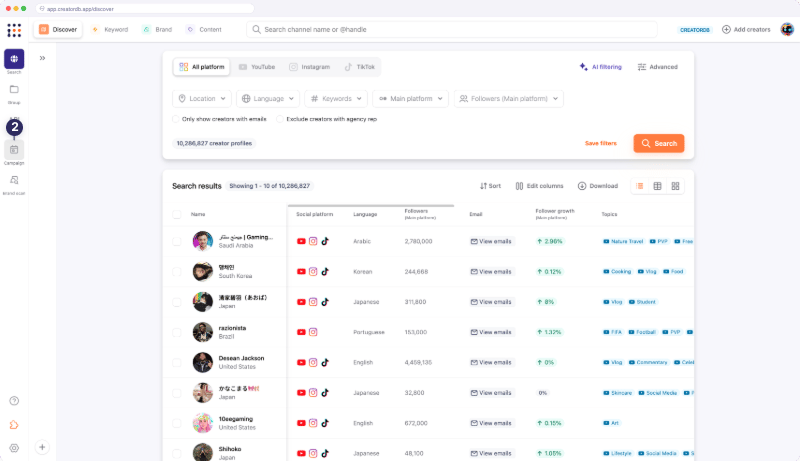
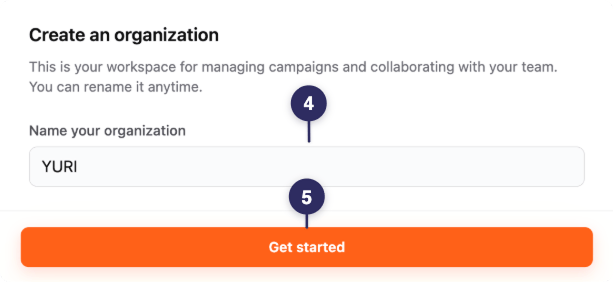
- Click Create new organization.
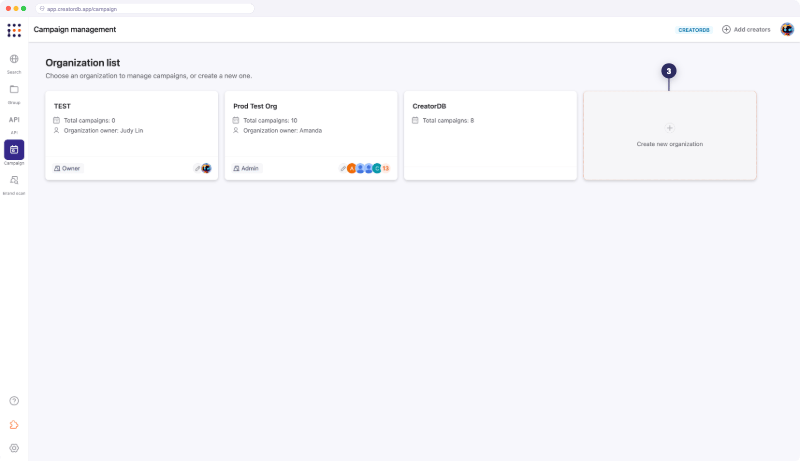
- Enter the organization name.
- Click Get started.
The organization is created.
Editing an organization
- Log in to your CreatorDB account.
- Click Campaign.
- Click on the organization name you want to edit on the Organization List page.
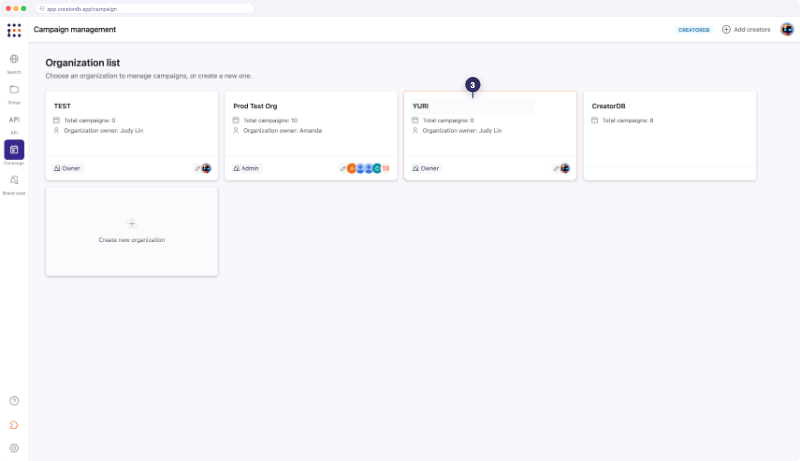
- Enter the new organization name.
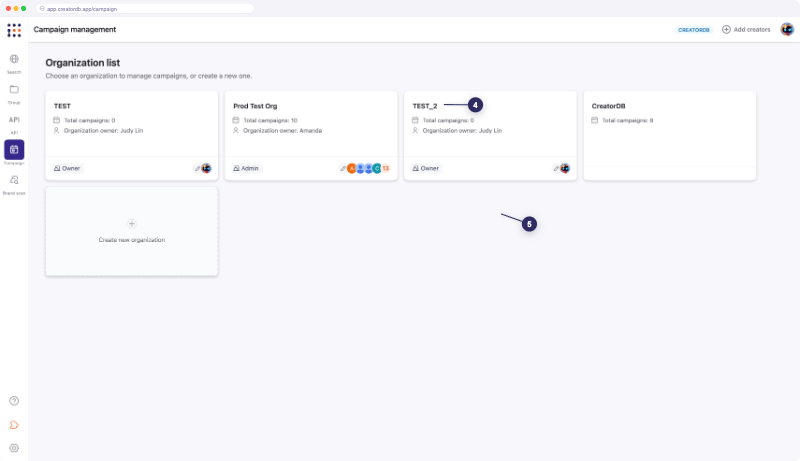
- Click outside the text field to save the organization name.
The organization name is updated.
Managing organization members
- Log in to your CreatorDB account.
- Click Campaign.
- Select an organization.
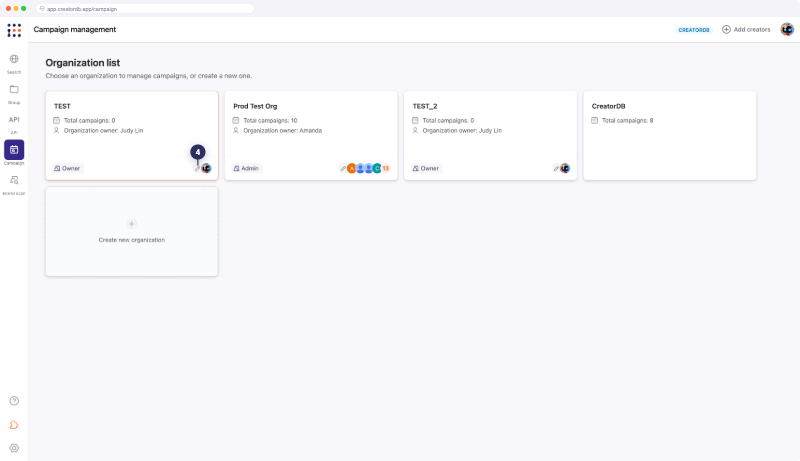
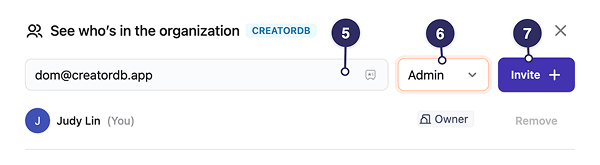
- Click Edit who’s in the organization.
See who’s in the organization page appears.
- Enter the email addresses of the members you want to add.
- Assign a role to each member (Admin, Member, or Guest).
- Click Invite.
Managing campaigns
You can manage and track campaign progress in CreatorDB. The campaign management features allows you to monitor the status of creators and their deliverables, as well as keep track of your team members campaign progress. You can also view campaign briefs and instructions to ensure that everyone is aligned on the campaign goals and requirements.Campaign roles and permissions
CreatorDB campaigns use a role-based permission system to control what each team member can do. When you add a member to a campaign, you assign them to one of the four roles — Manager, Member, Viewer, or Guest — each with a different level of access. CreatorDB recommends assigning the most restrictive role that still allows a person to do their work.Campaign roles
The table below describes each role and its intended use.Campaign permissions
The table below shows which actions each role can perform within a campaign.Campaign statuses
A campaign can have one of the following statuses:
| Complete | The campaign has finished. |
Creator statuses on the Kanban board
Within a campaign in the Kanban board view, creators can have different statuses to indicate their level of engagement and progress. If you have management role permissions, you can also add custom statuses as needed. The following default statuses are used to track creators in a campaign:Creating a campaign
- Log in to CreatorDB.
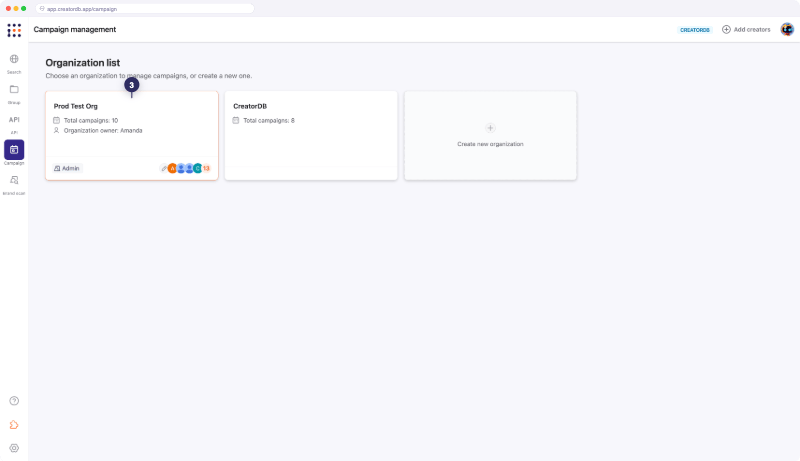
- Click Campaign.
- Optional: Select an organization.
You must be an organization admin or owner to view and manage the organization list. If you don’t have the necessary permissions, please contact your organization admin for assistance.
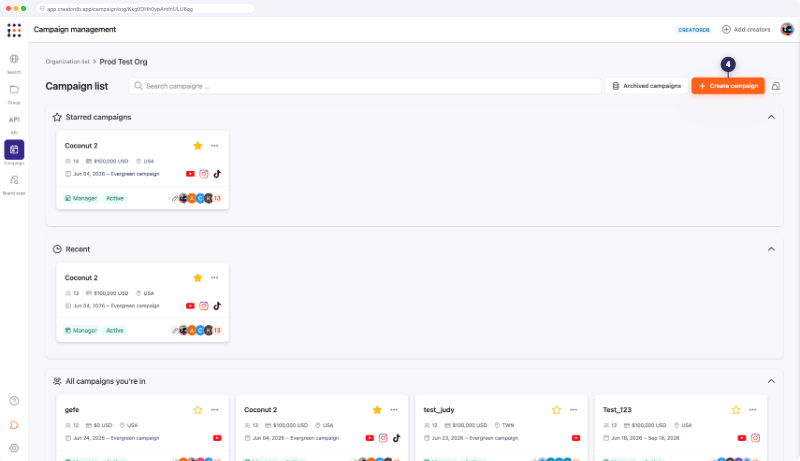
- Click Create Campaign.
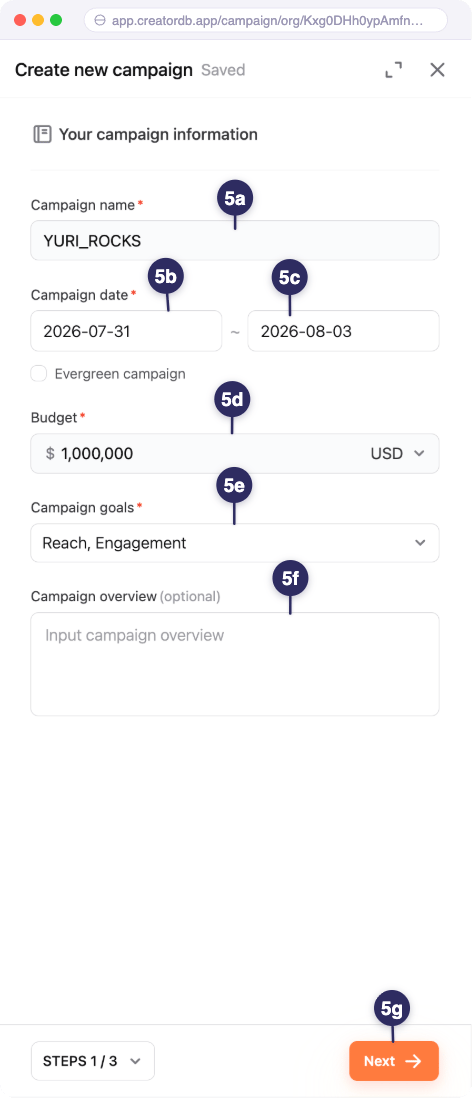
- Enter the campaign information.
a. Enter a campaign name.
b. Select a campaign start date.
c. Select a campaign end date.
d. Enter the campaign budget.
e. Select a campaign goal.
f. Optional: Enter a campaign overview description.
g. Click Next.
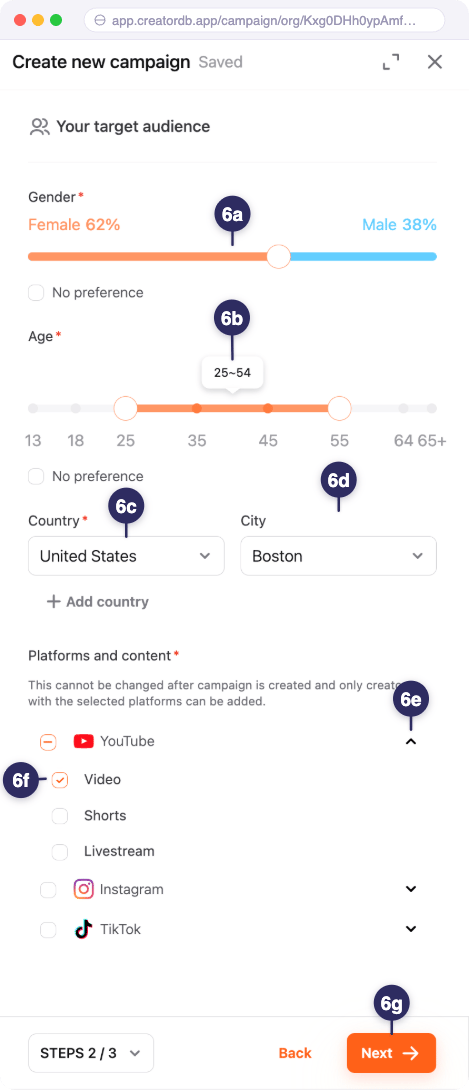
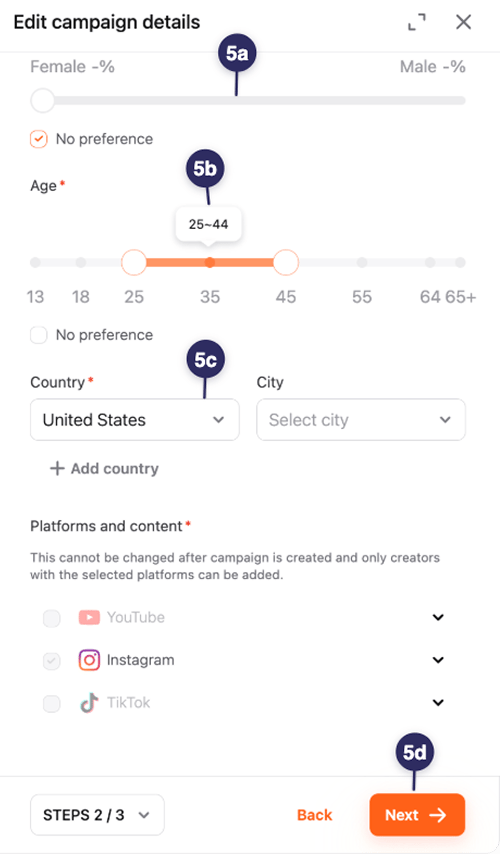
- Select the campaign’s target audience.
a. Select the gender ratio.
b. Select the age range.
c. Select the country.
d. Optional: Select the city.
e. Select the platform and content type.
f. Click Next.
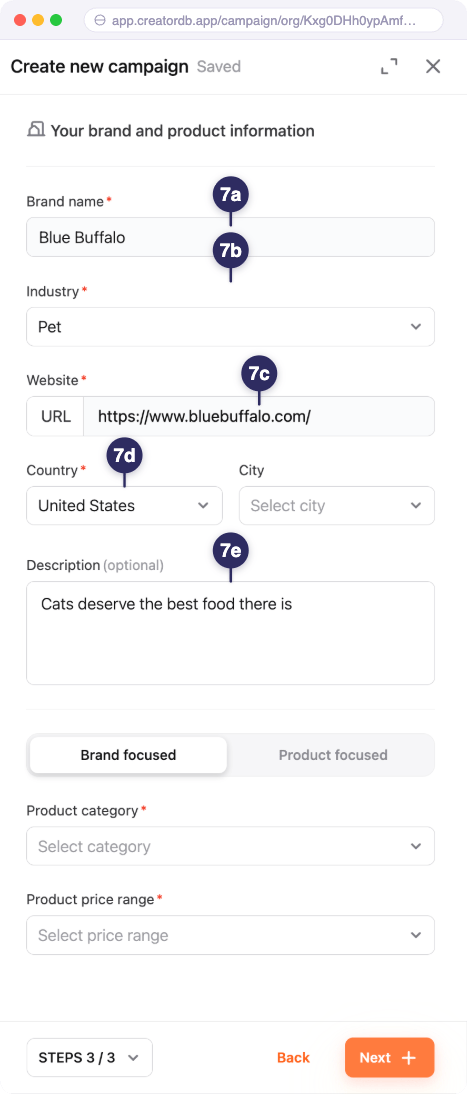
Brand focus
Brand focus
i. Click Brand focus.
ii. Select the product category.
iii. Select the product price range.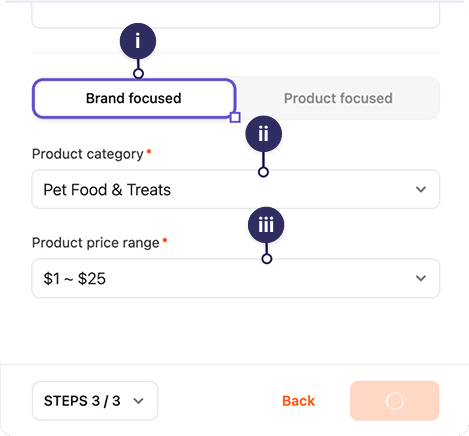
ii. Select the product category.
iii. Select the product price range.
Product focus
Product focus
i. Click Product focus.
ii. Select the product name.
iii. Select the product price range.
iv. Enter the product link.
v. Optional: Enter the product overview description.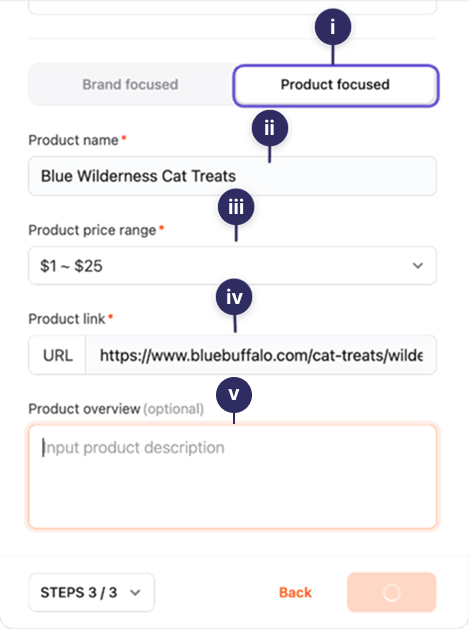
ii. Select the product name.
iii. Select the product price range.
iv. Enter the product link.
v. Optional: Enter the product overview description.
- Choose brand focus if the campaign is for a specific brand.
- Choose product focus if the campaign is for a specific product.
The add creator group window appears.
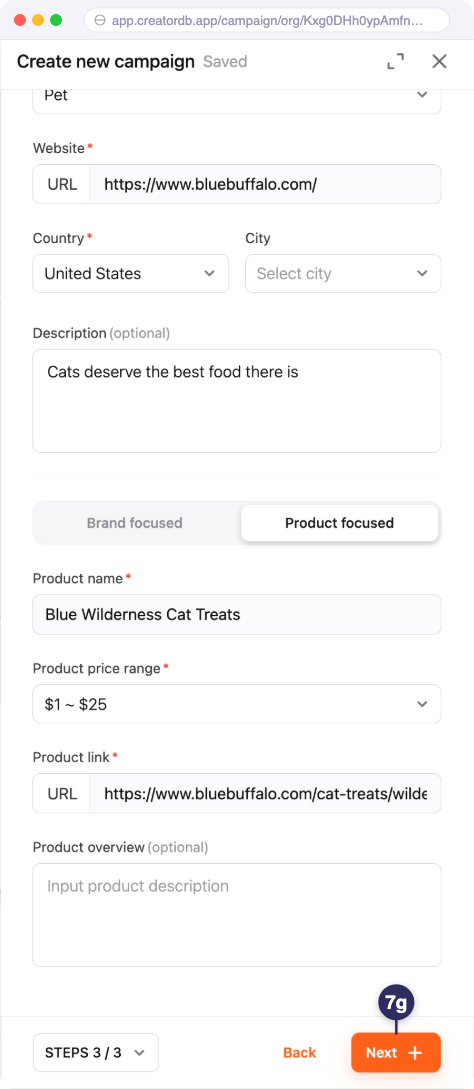
- Add a creator group to the campaign.
a. Select a creator group.
- You need to create a group before you can add it to a campaign. For details, see Creating a group.
- You can also search and add a group by name if you have many groups in your organization.
b. Click Add to campaign.
The campaign is created.
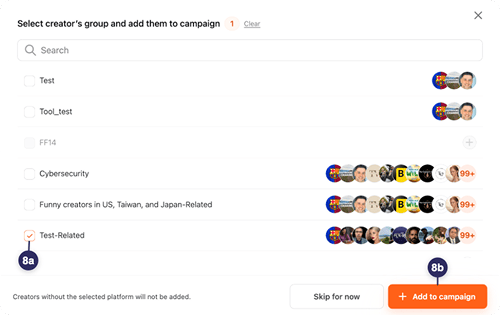
Editing a campaign
- Log in to CreatorDB.
- Click Campaign.
- Optional: Select an organization.
You must be an organization admin or owner to view and manage the organization list. If you don’t have the necessary permissions, please contact your organization admin for assistance.
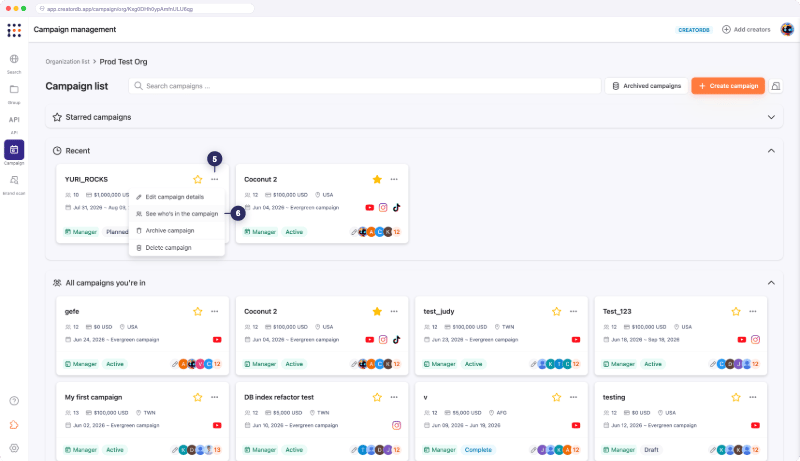
- Select a campaign.
- Click the Actions button.
A drop-down menu appears.
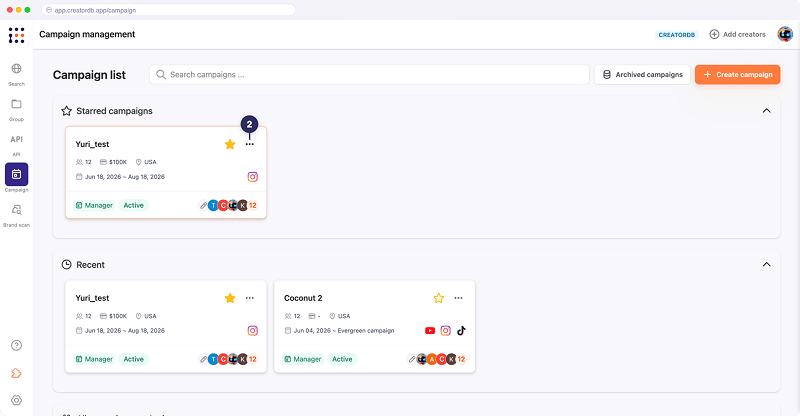
- Select Edit campaign details. The Edit campaign page appears.
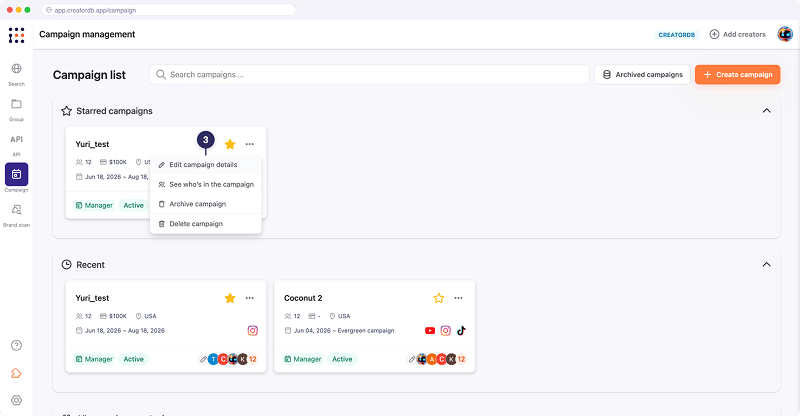
- Edit the campaign fields. For details, see Creating a campaign.
Adding campaign members
You can add or remove company staff or external clients to a campaign. Use the assign role features to manage the campaign content that each participant can access.- Log in to your CreatorDB account.
- Click Campaign.
- Optional: Select an organization.
You must be an organization admin or owner to view and manage the organization list. If you don’t have the necessary permissions, please contact your organization admin for assistance.
- Select a campaign.
- Click the Actions button.
A drop-down menu appears. - Select See who’s in the campaign.
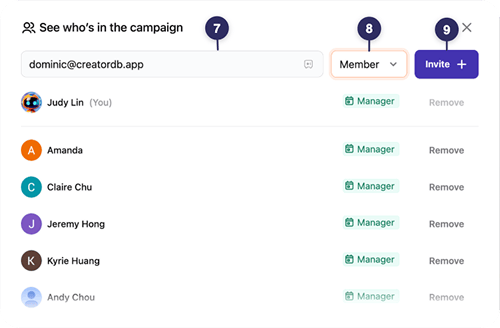
The See who’s in the campaign page appears.
- Enter the email addresses of the members you want to add.
- Assign a role to each member (Manager, Member, or Viewer).
- Click Invite.
Archiving a campaign
- Log in to your CreatorDB account.
- Click Campaign.
- Optional: Select an organization.
You must be an organization admin or owner to view and manage the organization list. If you don’t have the necessary permissions, please contact your organization admin for assistance.
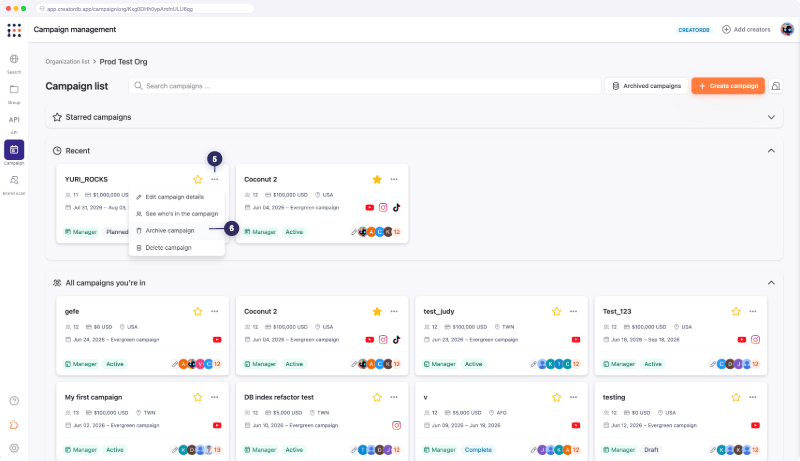
- Select a campaign.
- Click the Actions button.
A drop-down menu appears. - Select Archive campaign.
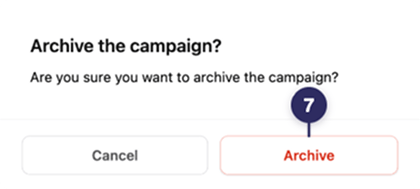
A confirmation window appears.
- Click Archive.
The campaign is archived.
Viewing archived campaigns
- Log in to your CreatorDB account.
- Click Campaign.
- Optional: Select an organization.
You must be an organization admin or owner to view and manage the organization list. If you don’t have the necessary permissions, please contact your organization admin for assistance.
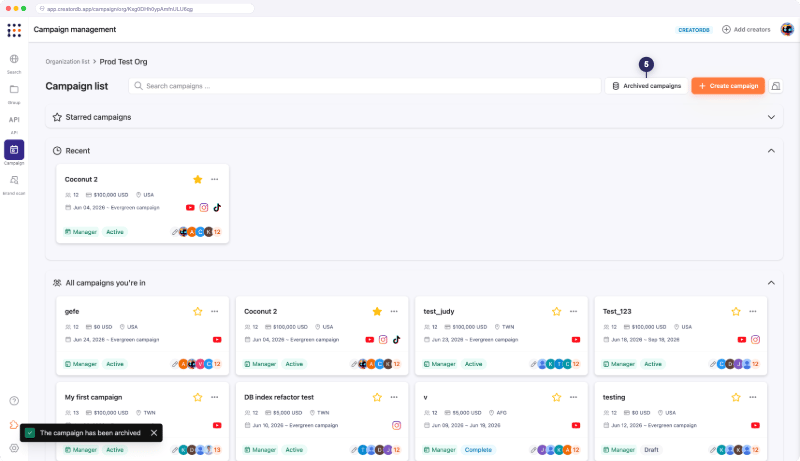
- Select a campaign.
- Click Archived campaigns. The Archived campaigns page appears.
Unarchiving a campaign
- Log in to your CreatorDB account.
- Click Campaign.
- Optional: Select an organization.
You must be an organization admin or owner to view and manage the organization list. If you don’t have the necessary permissions, please contact your organization admin for assistance. - Select a campaign.
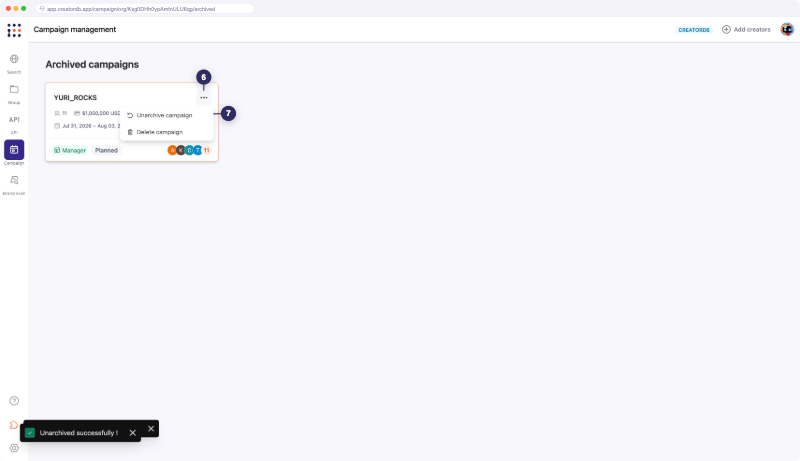
- Click Archived campaigns.
- Click the Actions button.
A drop-down menu appears. - Select Unarchive campaign.
The campaign is unarchived and moved back to the campaign list.
Deleting a campaign
- Log in to your CreatorDB account.
- Click Campaign.
- Optional: Select an organization.
You must be an organization admin or owner to view and manage the organization list. If you don’t have the necessary permissions, please contact your organization admin for assistance.
- Select a campaign.
- Click the Actions button.
A drop-down menu appears. - Select Delete campaign.
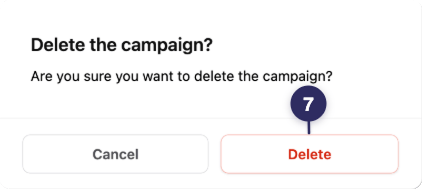
A confirmation message appears.
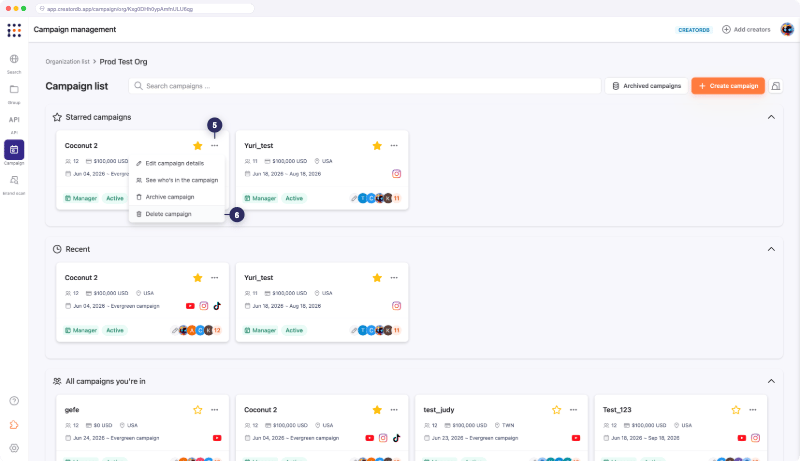
- Click Delete.